Robotic OS - Embedded Computer Vision on Raspberry Pi
Robotic OS (ROS) has been widely seen for years as the go-to solution for any company or student building an autonomous robot. As I am teaching more and more people about self-driving cars and Computer Vision, I thought it would be interesting to try and see how we can break the frontier between an online course and the real world…
Most online courses on Computer Vision will tell you how to work on the image, very few will talk about the camera. As I saw a major problem occurring, I wanted to build a course on Embedded Computer Vision using ROS (Robotic OS).
Why ROS?
For sure, it’s quite easy to find a tutorial on obstacle detection using a Raspberry Pi. So why bother including ROS?
The short answer: Obstacle detection for obstacle detection is pointless.
Why would we draw 2D Bounding Boxes around pedestrians or vehicles if nothing is behind it to interpret the data?
Why would we detect obstacles if not to make a decision based on the presence or absence of an obstacle?
So what do you do?
You can print the detected bounding boxes, you can even print them in a file. But what then? No autonomous robot will ever read files to get the obstacles; it’s just not working.
For an autonomous system to work, you need something like ROS. ROS is the meta operating system behind at least half of the self-driving cars out there! I believe any aspiring self-driving car engineer has to learn about ROS, or the risk is simply to get rejected by half of the companies.
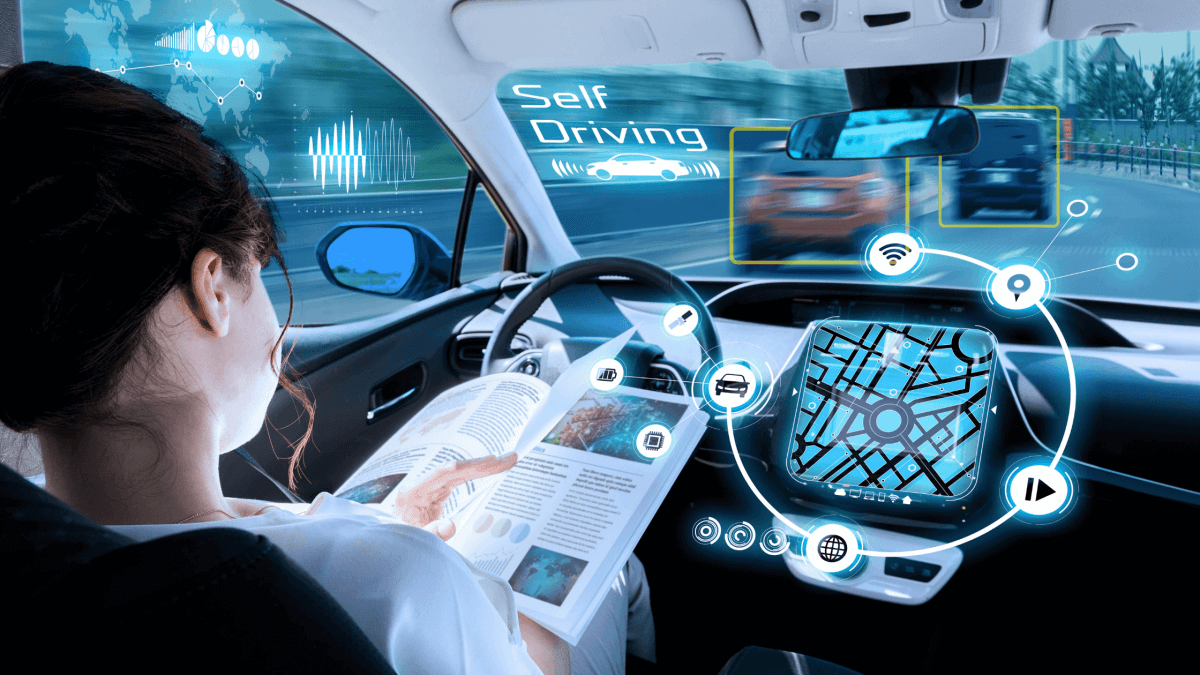
In this article, I will explain how to develop an embedded Computer Vision system that can play a real self-driving car recording (also called a bag), and add algorithms on this; all using a Raspberry Pi.
Robotic OS
In order to understand how to build a self-driving car, you need to understand the general concepts behind ROS.
ROS is using a Publisher/Subscriber architecture like the following.
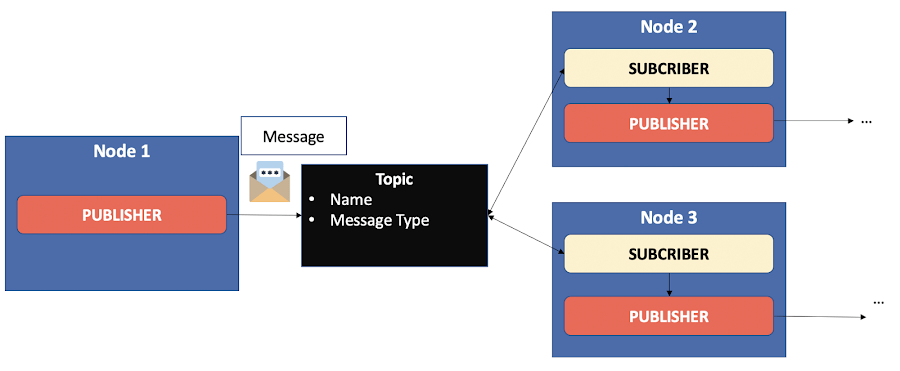
A ROS node is the equivalent of a function or a mini program.
Its role is to publish information (obstacles, position, …) that we call messages.
Each message is published on a topic.
A Node that publishes information is called a Publisher.
Those who listen to and use this information are called Subscribers.
Generally, a node is both Subscriber and Publisher, except in specific cases (for example, the camera node is only a Publisher, it doesn’t subscribe to anything).
This architecture makes it possible not to block the system if a module does not respond. Nodes publish no matter if there are other nodes listening.
The set of nodes forms a graph.
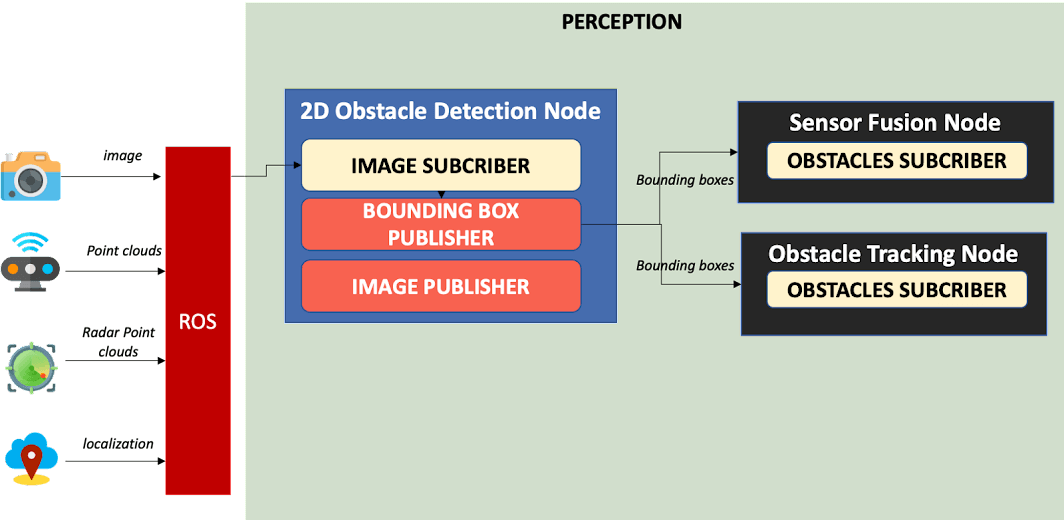
The course’s project is using ROS to detect obstacles in an image and publish bounding box information.
Here would be the typical architecture of such a project in a real self-driving car environment.
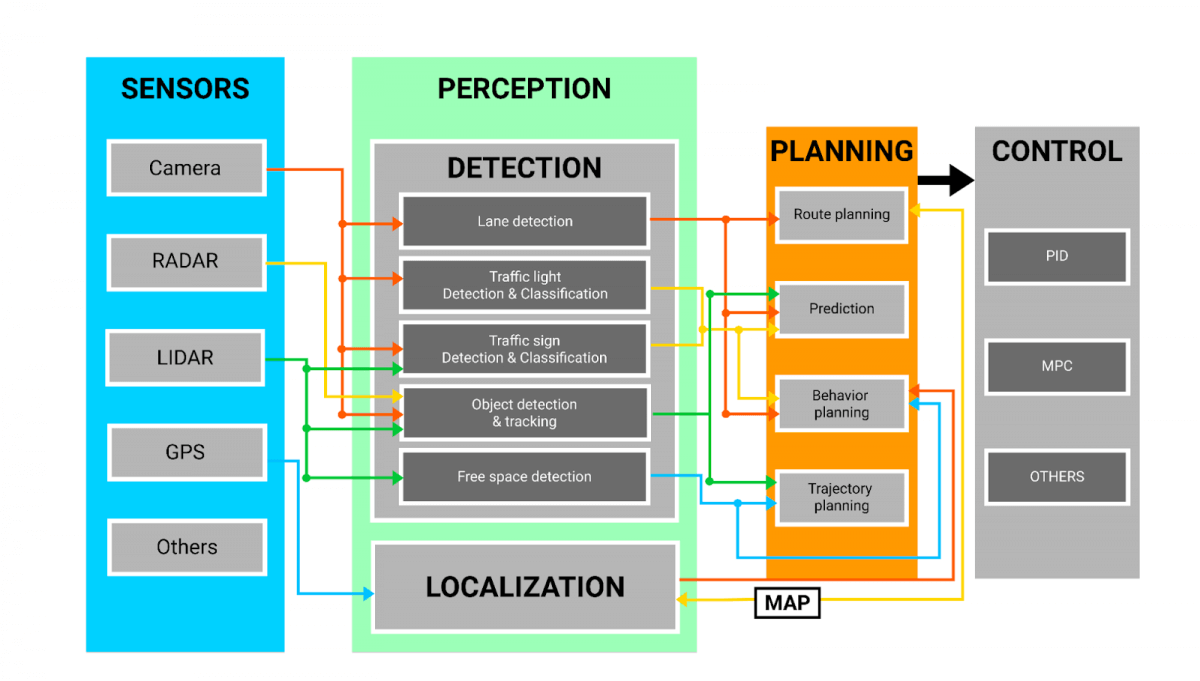
Self Driving Car ROS Architecture
In this image, you can see:
The sensors on the left are Publishers: They publish data like images, point clouds, ...
The rest are Nodes. Most subscribe to sensor data, or to other nodes, and then publish for the next node. All until we reach the controller, in charge of generating a steering and an acceleration value for the car.
We know that ROS is perfect for our problem: To build a useful obstacle detection algorithm that can be integrated in a real autonomous robot. Our next problem will be to find an embedded platform to use ROS.
Choosing a ROS Platform—
The Raspberry Pi has always found a community of edge Engineers who wish to build Do It Yourself projects.
What is it? It’s a mini-computer that is small, performant, and relatively cheap.
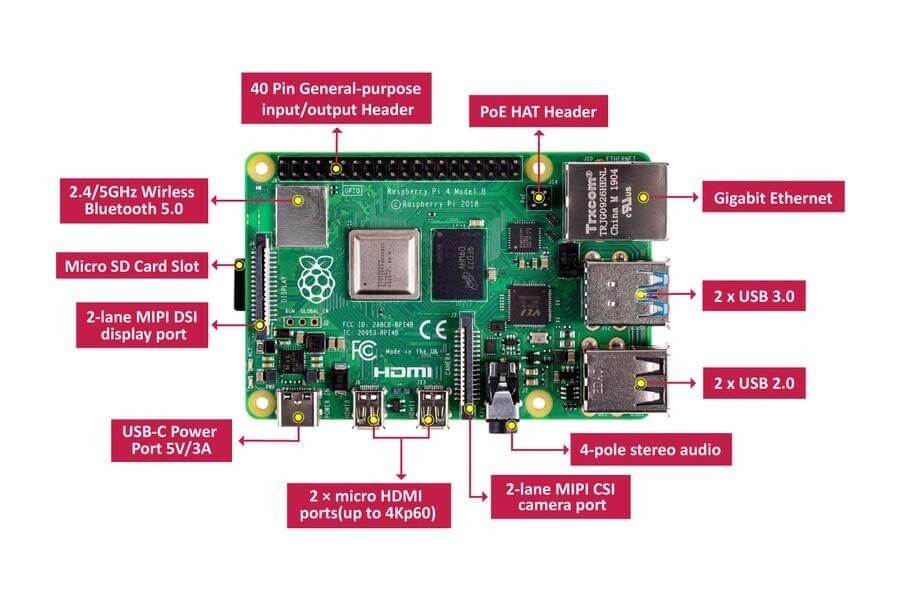
As I am building a new ROS course, I got interested in the Raspberry — Can this small device run ROS, embedded Computer Vision software, and be used as a remote platform for my students?
I looked into the Raspberry Pi 4 for a few weeks, I tried to understand how to use this tool the best I could… and how it would be a great use for my problem.
I also tried to see if other more appropriated devices such as the Nvidia Jetson Nano could be better suited.
Here’s what I found —
Raspberry Pi 4 vs. the rest
If we are to build a Do It Yourself project, or something like Edge Computer Vision, a lot of possibilities appear.For example, I recently wrote about VPUs and the Intel Movidius NCS. That’s a super powerful USB Key that can be plugged to a computer and provide a lot of processing power.More recently, the Nvidia Jetson Nano has been released and got a lot of attention.
Soon, the OpenCV AI Kit will be there as a revolutionizing tool.The last two computers have their own SDK; which means they won’t work right away. Most Computer Vision and edge devices are very good when it comes to running an OpenCV program, but are they good when we have to work with Robotic OS, LiDAR point clouds, and GPIO sensors?
Do they provide the possibility to plug any sensor and just make it work? This is one of the reasons I looked into the Raspberry Pi. It’s running Linux, has tons of GPIO possibilities, and can be used immediately!It’s more of a tiny computer than the rest because it wasn’t built for AI. It also has a lot of processing power, and the new 8Gb RAM version makes it super powerful! That, and the low price, are key elements.
Imagine students enrolled in my course want to buy it and try it themselves, a Jetson Nano would be a 200investment. The Raspberry Pi 4 costs about 100, which was great for my use.

If you have the budget, you can probably go for a Jetson Nano or even better, but in our case, the Raspberry Pi 4 can totally work.
Raspberry Pi 4 — Prerequisites to work with ROS
Operating System
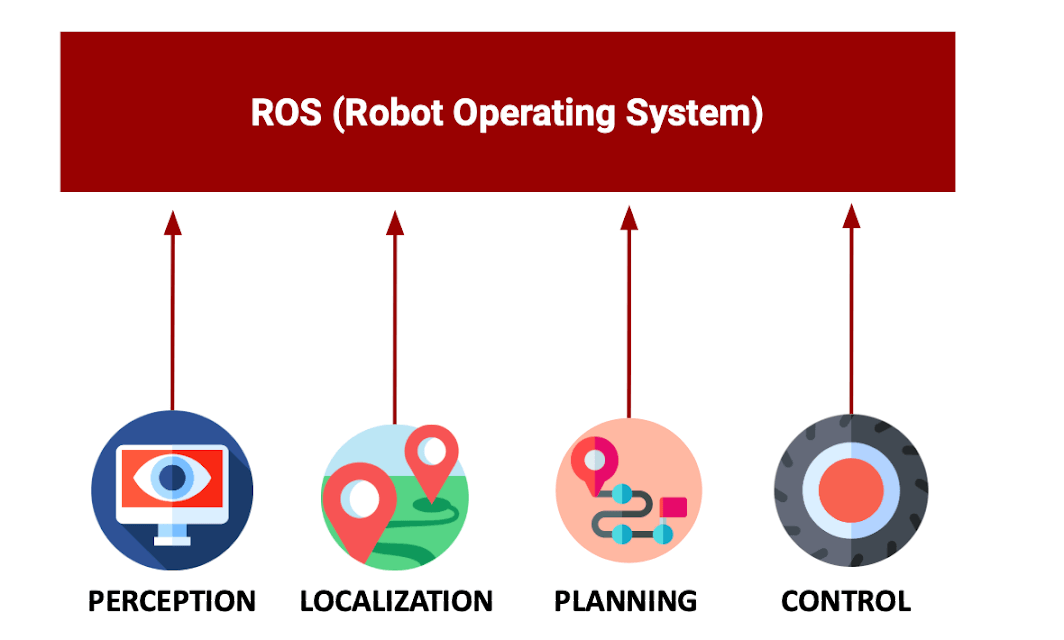
If a self-driving car has 4 elements (Perception, Localization, Motion Planning, Control); then we must use ROS to make these elements work together and build a real autonomous system.
Once I had the Raspberry Pi 4, and once I put it in the delightful red and white box, I had to use it with ROS.
ROS is widely used, but there is a problem. ROS only runs with Ubuntu and Debian. The new version, ROS 2, works with Mac OS and Windows X, but not with Raspbian, the default Raspberry Pi OS.
For that reason, I had to change the OS and use Ubuntu 20.04 on my Raspberry Pi 4. I could install ROS Noetic on the Raspberry Pi 4. This is where the fun begins!
32 vs 64 Bits
The Raspberry Pi website provides everything necessary to install Ubuntu, but it requires us to choose between a 32 bit version and a 64 bit version. Using the 64 bit version helps using the full RAM of the Rapsberry (8Gb) and not just 2³² bits (4Gb). In our case, it’s can be necessity.
Some problems came, a 64 bit Ubuntu is great, but it doesn’t work with VNC.
Remote Control
VNC (Virtual Network Computing) is the go-to option for remote control.
I don’t want to plug a mouse and a keyboard on my Raspberry Pi. I want to plug my Raspberry Pi on my wifi box and use it on my Macbook Pro. Also, if students ever had to connect on it, it had to work.
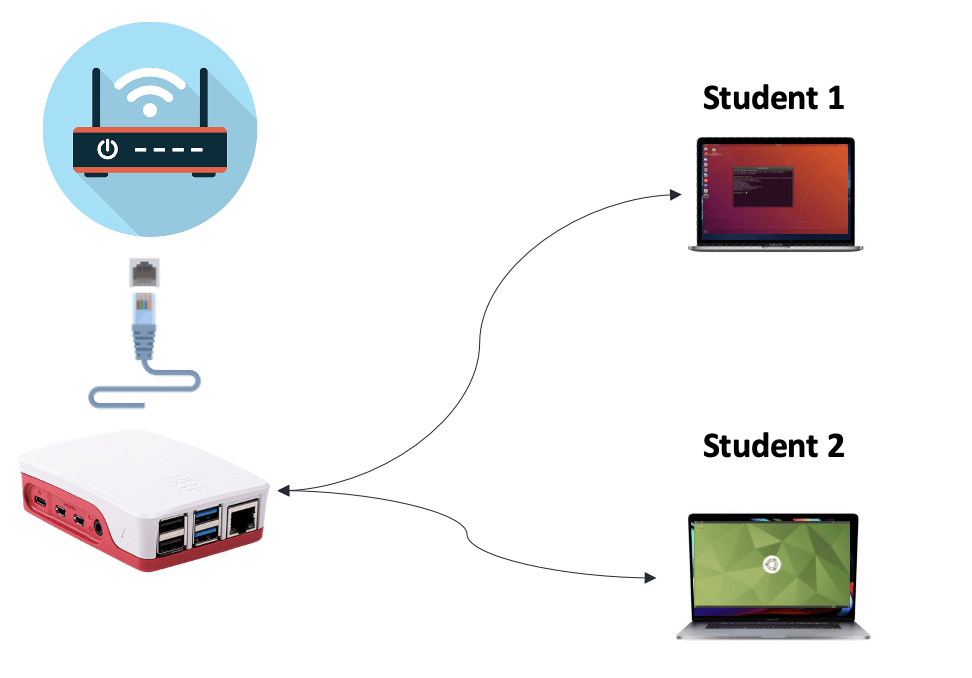
Since VNC couldn’t work on Ubuntu 64 bits, I had to use another solution called Microsoft Remote Desktop that uses XRDP protocol.We’re all set, we installed Ubuntu, ROS, and made sure we could fix any issue regarding the choices we made. We can now start to work with the project.
Building a ROS Project
The Project
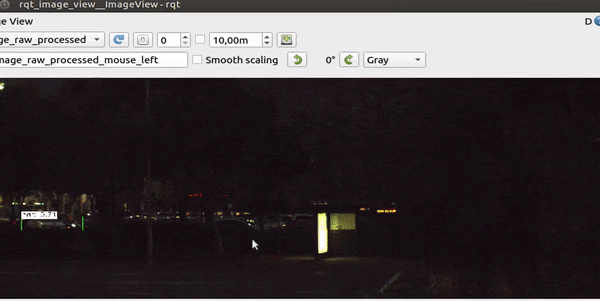
So what can we expect from our project?Well, what if we plugged a camera and performed obstacle detection? What if we plugged a LiDAR and performed Point Cloud Processing? In reality, anything is possible.👉 In this project, I chose to focus on the camera aspect, but understand that we can do everything simultaneously. Here’s the project architecture.
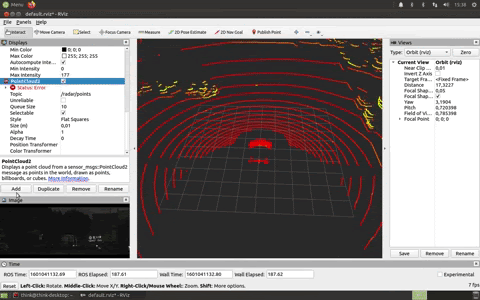
The first thing I did was to play a Bag File. A Bag File is a recording of everything that is going on in a self-driving car. We can record camera images, LiDAR data, and many more, and then play it. In my case, I had access to LiDAR, camera, RADAR, and GPS data.
I played the bag, and displayed interesting data. It all ran using 85% of CPU and 1/8 Gb of RAM, leaving plenty of space for the algorithms.
Why a bag file?
When you use a Bag File, you replace the sensors. Instead of purchasing sensors and then going in the street to sense something, I just used someone else’s work and made it work on my computer.Most Engineers work with Bag Files.
They don’t go out every time they want to test something; they replay the events and see how their algorithms perform now.
Embedded Computer Vision
My first intuition to teach students how to use ROS is to make them build a node (program) that would:
Subscribe to the camera information
Publish the obstacles it found using a YOLOv4 algorithm.
All of that was possible, the students on the course learned to implement it. The course covers a lot of concepts and details to build the project:
How to use CV Bridge and avoid popular errors (you can literally lose days)?
How to build obstacle detection algorithms on ARM Processors (on Raspberry Pi and other embedded devices)?
How to publish custom messages and make sure we can compile in every situation?
How to work in Python and C++ at the same time?
and many more…
The course is called START WITH ROS: Build Real Robotics Applications on the edge.
“The future of AI is tiny and on the edge.”
I didn’t say it, Harvard did on their website. Cloud Computing has allowed us to learn a lot about AI and Deep Learning, but it did hide an important part: the hardware.In an autonomous robot, understanding the sensors, the hardware, and the platforms you’re working on is beyond mandatory; it’s part of the job.
The course will teach you the fundamentals of Robotic OS, but also important Hardware concepts you must know as an aspiring Self-Driving Car Engineer. It has everything you need to get started, and to keep building great projects on it.
To enroll in the course, here’s the link: https://courses.thinkautonomous.ai/ros